Intermediate Tutorial: Semantic Segmentation Textures
In this tutorial we will walk through how to get masks from the semantics system. We’ll then use these masks for a simple overlay effect using an OnRenderImage call.
Note
The mocking system demonstrated in the video has been updated in ARDK 1.3. For details on mock mode changes see the additional Mock Mode video <https://www.youtube.com/watch?v=HkPfxBZPE_Q>.
Preparation
This tutorial assumes you have a working Unity scene where you have imported the ARDK & ARDK-examples packages, and configured the project to run on a device. If you haven’t already imported the packages, in your project view:
Right-click the Asset folder > Import Package > Custom Package> select the ARDK package you downloaded > Import All
Right-click the Asset folder > Import Package > Custom Package> select the ARDK-examples package you downloaded > Import All
Update the build and player settings for building Android or iOS.
Please refer to the Getting Started With ARDK page for more details.
Steps
Create a new scene.
In the Scenes section of the Project view, create a folder (right-click Create > Folder) and call it
SemanticTexturesIn that folder create a new scene (right-click Create > Scene) and call it
SemanticTexturesTutorialAdd the scene in the project Build Settings so it will be added when we start the app.
Setup the camera.
Add the ARCameraPositionHelper component to the camera
Add the ARRenderingManager to the camera
Make sure the Camera Variable on both helpers is set to the Main Camera
Change the camera’s background to a solid color and make it black.
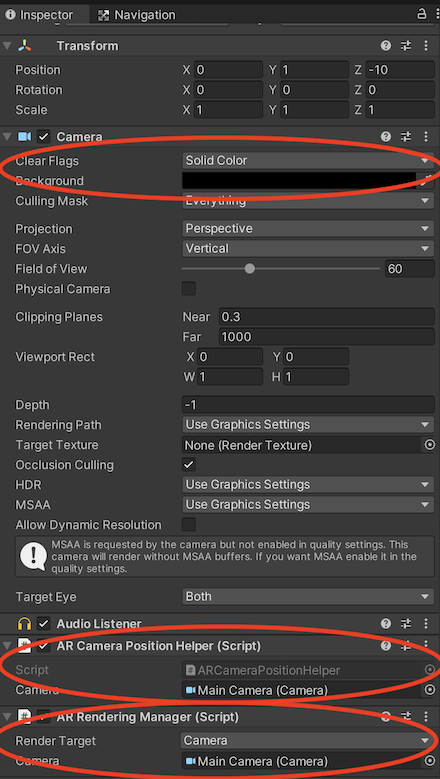
Add ARDK Managers.
For this tutorial, we’ll add the managers to the camera object, but you can add them to an empty game object if you need a particular layout in your scene.
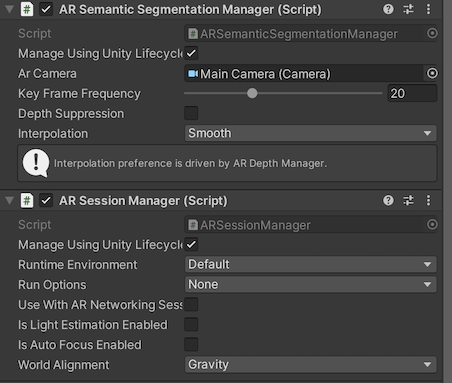
Add a Session Manager to the camera.
Add a Semantic Segmentation Manager to the camera.
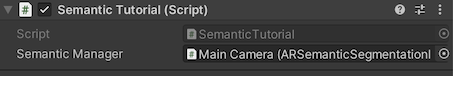
Create your script.
Create a new Script (right-click Create > Script) and call it
SemanticTutorial.Add it to the camera as a component (drag it onto the camera or click Add Component on the camera and search for
SemanticTutorial)
SemanticTutorial script that takes a semantic manager and adds the callback for new buffers:
using System.Collections;
using System.Collections.Generic;

using Niantic.ARDK;
using Niantic.ARDK.AR;
using Niantic.ARDK.Extensions;
using Niantic.ARDK.AR.ARSessionEventArgs;
using Niantic.ARDK.AR.Configuration;
using Niantic.ARDK.AR.Awareness;
using Niantic.ARDK.AR.Awareness.Semantics;

using UnityEngine;
using UnityEngine.UI;

public class SemanticTutorial : MonoBehaviour
{
    //pass in our semantic manager
    public ARSemanticSegmentationManager _semanticManager;

    void Start()
    {
        //add a callback for catching the updated semantic buffer
        _semanticManager.SemanticBufferUpdated += OnSemanticsBufferUpdated;
    }

    //will be called when there is a new buffer
    private void OnSemanticsBufferUpdated(ContextAwarenessStreamUpdatedArgs<ISemanticBuffer> args)
    {

    }
}
After you’ve added the script, set the Semantic Manager variable to the AR Semantic Segmentation Manager you added earlier. Later we’ll call a couple of functions to create a texture from the semantic buffer and add variables to link out to a UI image to display the texture.
Build and run the scene in Unity editor.
Fix any build errors you might have due to missing a namespace or typos.
At this point, when you run the scene, you should see a blank screen with a skydome in Unity.

Setup mocking so you can test semantics in Unity.
Download the ARDK Mock Environments package from the ARDK Downloads page.
Import the package into your Unity project.
In the Lightship > ARDK > Virtual Studio window, go to the Mock tab and select the
ParkPondprefab from the Mock Scene dropdown. The prefab will automatically be instantiated in your scene when you run in the Unity editor.
Run in Unity.
At the moment you’ll just see the mock environment with no overlay for the semantics.
Update the callback to process the buffer into a masking texture.
We will use
CreateOrUpdateTextureARGB32to create a texture directly from the buffer. This will not be cropped and aligned to the scene, however ARDK provides a matrix for you to use when sampling this buffer.The SamplerTransform can be used to to align it to the screen by multiplying the transform by the UV coords in a vertex shader.
To create the texture:
Update the
OnSemanticBufferUpdatedfunction to callCreateOrUpdateTextureARGB32.Add an
OnRenderFuntionto our script in order to blit to the screen with our shader.Add a variable to add in a material to render with (our shader).
Make sure your tutorial script is on the camera object as we are using
OnRenderImage.
OnSemanticBufferUpdated method in SemanticTutorial updated to use CreateOrUpdateTextureARGB32:
Texture2D _semanticTexture;

private void OnSemanticsBufferUpdated(ContextAwarenessArgs<ISemanticBuffer> args)
{
    //get the buffer that has been surfaced.
    ISemanticBuffer semanticBuffer = args.Sender.AwarenessBuffer;
    //ask for a mask of the sky channel
    int channel = semanticBuffer.GetChannelIndex("sky");

    //get the channel from the buffer we would like to use using create or update.
    semanticBuffer.CreateOrUpdateTextureARGB32(
        ref _semanticTexture, channel
    );
}
OnRenderImage function in SemanticTutorial:
public class SemanticTutorial : MonoBehaviour
{
    public Material _shaderMaterial;

    void OnRenderImage(RenderTexture source, RenderTexture destination)
    {
        //pass in our texture
        //Our Depth Buffer
        _shaderMaterial.SetTexture("_SemanticTex", _semanticTexture);

        //pass in our transform
        _shaderMaterial.SetMatrix("_semanticTransform", _semanticManager.SemanticBufferProcessor.SamplerTransform);

        //blit everything with our shader
        Graphics.Blit(source, destination, _shaderMaterial);
    }
}
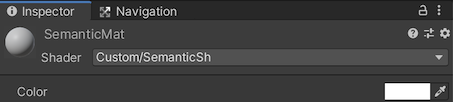
Create your material and your shader.
In the project view, right-click Create > Material. Name the material
SemanticMat.Right-click Create > Shader (pick any type, Standard Surface Shader is fine as we will be replacing all the code in it). Name the shader
SemanticSh.Point your Material at your shader, and then set/pass in the material to the
SemanticTutorialscript.
Update your shader to take in your Texture and Transform and display it.
The shader will take in
_SemanticTexand_semanticTransform.In the vertex shader we will multiply our UVs by the semanticTransform and store them for use in the Frag shader.
Then in the Frag shader we will use the transformed UVs when looking up a point in the texture.
Shader "Custom/SemanticSh"
{
    Properties
    {
        _MainTex ("Texture", 2D) = "white" {}
        _SemanticTex("_SemanticTex", 2D) = "red" {}
    }
    SubShader
    {
        // No culling or depth
        Cull Off ZWrite Off ZTest Always

        Pass
        {
            CGPROGRAM
            #pragma vertex vert
            #pragma fragment frag

            #include "UnityCG.cginc"

            struct appdata
            {
                float4 vertex : POSITION;
                float2 uv : TEXCOORD0;
            };

            struct v2f
            {
                float2 uv : TEXCOORD0;
                float4 vertex : SV_POSITION;
                //storage for our transformed depth uv
                float3 semantic_uv : TEXCOORD1;
            };

            // Transforms used to sample the context awareness textures
            float4x4 _semanticTransform;

            v2f vert (appdata v)
            {
                v2f o;
                o.vertex = UnityObjectToClipPos(v.vertex);
                o.uv = v.uv;

                //multiply the uv's by the depth transform to roate them correctly.
                o.semantic_uv = mul(_semanticTransform, float4(v.uv, 1.0f, 1.0f)).xyz;
                return o;
            }

            //our texture samplers
            sampler2D _MainTex;
            sampler2D _SemanticTex;


            fixed4 frag (v2f i) : SV_Target
            {
                //unity scene
                float4 mainCol = tex2D(_MainTex, i.uv);
                //our semantic texture, we need to normalise the uv coords before using.
                float2 semanticUV = float2(i.semantic_uv.x / i.semantic_uv.z, i.semantic_uv.y / i.semantic_uv.z);
                //read the semantic texture pixel
                float4 semanticCol = tex2D(_SemanticTex, semanticUV);

                return mainCol+semanticCol;
            }
            ENDCG
        }
    }
}
Run in Unity.
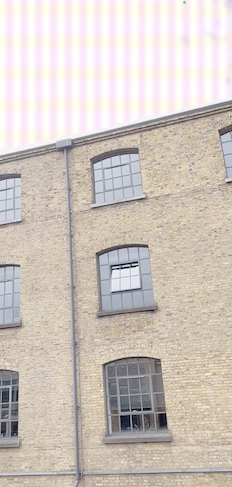
You should now have a white mask over any objects that are marked as sky.

Add effects to the shader.
Let’s add some colorization to the sky channel.
Replace the fragment section of your shader with the following code. This example just uses sine and cosine to create a simple pattern and mixes that into the background.
fixed4 frag (v2f i) : SV_Target
{
    //unity scene
    float4 mainCol = tex2D(_MainTex, i.uv);
    //our semantic texture, we need to normalise the uv coords before using.
    float2 semanticUV = float2(i.semantic_uv.x / i.semantic_uv.z, i.semantic_uv.y / i.semantic_uv.z);
    //read the semantic texture pixel
    float4 semanticCol = tex2D(_SemanticTex, semanticUV);


    //add some grid lines to the sky
    semanticCol.g *= sin(i.uv.x* 100.0);
    semanticCol.b *= cos(i.uv.y* 100.0);
    //set alpha to blend rather than overight
    semanticCol.a *= 0.1f;

    //mix the main color and the semantic layer
    return lerp(mainCol,semanticCol, semanticCol.a);
}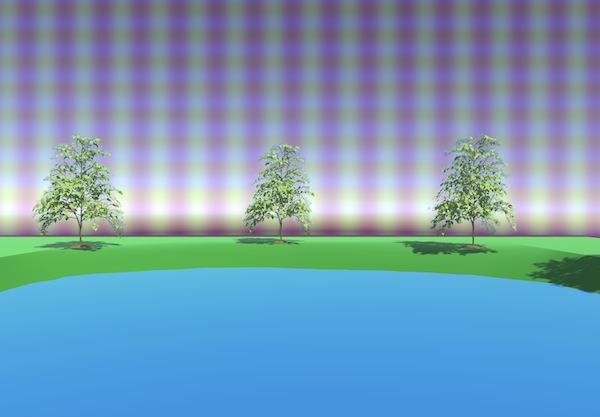
Run on your phone and verify the shader effect on the sky.
Select File > Build & Run.
Build in Xcode & run on the phone.
Remember to stop debugging and re-run it manually. When the debugger is attached the output is degraded.
You should now see that the sky is overlaid with stripes.
Other things to try:
You can change the channel you are working with (sky, building, foliage, ground).
Use multiple channels, change effects for different channels.
Render something else where the masks are, maybe a view through into the game world.
Completed Source
SemanticTutorial.cs
using System.Collections;
using System.Collections.Generic;

using Niantic.ARDK;
using Niantic.ARDK.AR;
using Niantic.ARDK.Extensions;
using Niantic.ARDK.AR.ARSessionEventArgs;
using Niantic.ARDK.AR.Configuration;
using Niantic.ARDK.AR.Awareness;
using Niantic.ARDK.AR.Awareness.Semantics;

using UnityEngine;
using UnityEngine.UI;

public class SemanticTutorial : MonoBehaviour
{
    public Material _shaderMaterial;

    Texture2D _semanticTexture;

    public ARSemanticSegmentationManager _semanticManager;

    void Start()
    {
        //add a callback for catching the updated semantic buffer
        _semanticManager.SemanticBufferUpdated += OnSemanticsBufferUpdated;
        //on initialisation
        ARSessionFactory.SessionInitialized += OnSessionInitialized;
    }

    private void OnSessionInitialized(AnyARSessionInitializedArgs args)
    {
        Resolution resolution = new Resolution();
        resolution.width = Screen.width;
        resolution.height = Screen.height;
        ARSessionFactory.SessionInitialized -= OnSessionInitialized;
    }

    private void OnSemanticsBufferUpdated(ContextAwarenessStreamUpdatedArgs<ISemanticBuffer> args)
    {

        //get the current buffer
        ISemanticBuffer semanticBuffer = args.Sender.AwarenessBuffer;
        //get the index for sky
        int channel = semanticBuffer.GetChannelIndex("sky");

        semanticBuffer.CreateOrUpdateTextureARGB32(
                ref _semanticTexture, channel
            );
    }

    void OnRenderImage(RenderTexture source, RenderTexture destination)
    {
        //pass in our texture
        //Our Depth Buffer
        _shaderMaterial.SetTexture("_SemanticTex", _semanticTexture);

        //pass in our transform
        _shaderMaterial.SetMatrix("_semanticTransform", _semanticManager.SemanticBufferProcessor.SamplerTransform);

        //blit everything with our shader
        Graphics.Blit(source, destination, _shaderMaterial);
    }
}
SemanticSh Shader
Shader "Custom/SemanticSh"
{
    Properties
    {
        _MainTex ("Texture", 2D) = "white" {}
        _DepthTex("_SemanticTex", 2D) = "red" {}
    }
    SubShader
    {
        // No culling or depth
        Cull Off ZWrite Off ZTest Always

        Pass
        {
            CGPROGRAM
            #pragma vertex vert
            #pragma fragment frag

            #include "UnityCG.cginc"

            struct appdata
            {
                float4 vertex : POSITION;
                float2 uv : TEXCOORD0;
            };

            struct v2f
            {
                float2 uv : TEXCOORD0;
                float4 vertex : SV_POSITION;
                //storage for our transformed depth uv
                float3 semantic_uv : TEXCOORD1;
            };

            // Transforms used to sample the context awareness textures
            float4x4 _semanticTransform;

            v2f vert (appdata v)
            {
                v2f o;
                o.vertex = UnityObjectToClipPos(v.vertex);
                o.uv = v.uv;

                //multiply the uv's by the depth transform to roate them correctly.
                o.semantic_uv = mul(_semanticTransform, float4(v.uv, 1.0f, 1.0f)).xyz;
                return o;
            }

            //our texture samplers
            sampler2D _MainTex;
            sampler2D _SemanticTex;


            fixed4 frag (v2f i) : SV_Target
            {
                //unity scene
                float4 mainCol = tex2D(_MainTex, i.uv);
                //our semantic texture, we need to normalise the uv coords before using.
                float2 semanticUV = float2(i.semantic_uv.x / i.semantic_uv.z, i.semantic_uv.y / i.semantic_uv.z);
                //read the semantic texture pixel
                float4 semanticCol = tex2D(_SemanticTex, semanticUV);


                //add some grid lines to the sky
                semanticCol.g *= sin(i.uv.x* 100.0);
                semanticCol.b *= cos(i.uv.y* 100.0);
                //set alpha to blend rather than overight
                semanticCol.a *= 0.1f;

                //mix the main color and the semantic layer
                return lerp(mainCol,semanticCol, semanticCol.a);
            }
            ENDCG
        }
    }
}