Scanning Settings
Here you will find information on how to customize your scan visualizations, scan processing, and about the IScanner interface.
Note
This is a Public Beta feature and functionality may change in a future release. For more information on ARDK feature launch types like Public Beta, see Lightship Launch Types.
Visualizing Scans
The Scanning Framework provides several scanning visualizers to help the user visualize what is being scanned.
During a scan, the Scanning Framework provides two sets of raw scanning data that you can use for visualization: a screen space raycast buffer and a world space voxel buffer.
The raycast buffer is computed by raycasts from the current camera pose to produce a 2D texture that contains the color, depth, and normal information of the visible voxels from the current position. The Scanning Framework returns this data via the IRaycastBuffer interface in an IScanner.VisualizationUpdated callback.
The voxel buffer is a representation of all the voxels that lie on the boundary of detected surfaces. The Scanning Framework returns this data via the IVoxelBuffer interface in an IScanner.VisualizationUpdated callback.
On very old devices, the Scanning Framework may fall back to not providing visualization data for performance reasons.
If you’re using ARScanManager, you can use the following provided implementations of IScanVisualizer (instead of using the raw IRaycastBuffer or IVoxelBuffer data) to easily add visualizers to your scan:
PointCloudVisualizer - uses the voxel buffer to render a point-cloud representation of the current scan.
RaycastScanVisualizer - draws the color of the scan’s raycast buffer on screen. This must be added to a Unity camera, usually as a component to the
ARSceneCamera.WorldSpaceScanVisualizer - uses the raycast buffer to render normal and depth aware discs of the current scan.
The following image shows a basic example use of the WorldSpaceScanVisualizer.

To enable these visualizers, set the visualizer before calling StartScanning() by calling ARScanManager.SetVisualizer().
using Niantic.ARDK.AR;
using Niantic.ARDK.AR.Scanning;
using Niantic.ARDK.Extensions;
using Niantic.ARDK.Extensions.Scanning;

PointCloudVisualizer _pointCloudVisualizer;
//...
_arScanManager.SetVisualizer(_pointCloudVisualizer);
_arScanManager.StartScanning();
//...
Processing Scans
You can configure how the Scanning Framework processes scans by setting the scan mode, mesh quality, and texture quality settings. You can also set the maximum scan distance for scans. We recommend using the following settings depending on your use case:
Use case |
Scan mode |
Mesh quality |
Texture quality |
Max Scan Distance (in meters) |
|---|---|---|---|---|
Creating 3D models for small objects (no bigger than approximately 1m radius) |
DETAIL |
VERY_HIGH |
HIGH |
2 |
Creating 3D models for large objects and scenes |
AREA |
VERY_HIGH |
VERY_HIGH |
5 |
Scanning wayspots for VPS mapping |
AREA |
LOW |
LOW |
5 |
Note
DETAIL mode processes the scan more slowly than AREA mode, especially on Android devices. For individual use cases, we recommend you experiment with different Mesh Quality settings to find a good speed/quality tradeoff.
To configure the scan distance, set ScanningOptions.MaxScanningDistance before you scan. To configure scan mode, mesh quality, and texture quality, set the ReconstructionOptions before processing your scan.
If you’re using ARScanManager, set the ARScanManager’s reconstructionMode, meshQuality, and textureQuality properties before calling ARScanManager.StartProcessing().
using Niantic.ARDK.AR.Scanning;

private ARScanManager _scanManager;

// ...

_scanManager.reconstructionMode = ReconstructionOptions.ReconstructionMode.AREA;
_scanManager.meshQuality = ReconstructionOptions.Quality.HIGH;
_scanManager.textureQuality = ReconstructionOptions.Quality.HIGH;

_scanManager.StartProcessing();
If you’re using IScanner, pass in the desired ReconstructionOptions settings to IScanner.StartProcessing().
using Niantic.ARDK.AR.Scanning;

private IScanner _scanner;

// ...

_scanner.StartProcessing(new ReconstructionOptions(ReconstructionOptions.ReconstructionMode.AREA, ReconstructionOptions.Quality.HIGH, ReconstructionOptions.Quality.HIGH));
Using IScanner Instead of ARScanManager
If you can’t use ARScanManager, you can create your own IScanner instance using ScannerFactory:
using Niantic.ARDK.AR.Scanning;
_scanner = ScannerFactory.Create(ARSession);
Use IScanner scanning and processing methods as needed. You’ll need to provide handlers for VisualizationUpdated and ScanCompleted to update your scan visualizer and receive scan results.
_scanner.OnVisualizationUpdate += (IVoxelBuffer voxelBuffer, IRaycastBuffer raycastBuffer) =>
{
    // Forward buffers to a IScanVisualizer implementation like
    // RaycastScanVisualizer, or to your own implementation of
    // IScanVisualizer
    visualizer?.OnScanProgress(voxelBuffer, raycastBuffer);
};

_scanner.OnProcessScanComplete += (TexturedMesh texturedMesh, IScanner.State state) =>
_scanner.OnProcessScanComplete += (TexturedMesh texturedMesh, IScanner.State state, Vector3 centerPosition) =>
{
    // ...handle TexturedMesh as needed...
};
You’ll also need to provide your own mechanism for saving and managing processed scans. You can replicate ARScanManager.SaveCurrentScan() and other other methods that use ScanStore to manage scans.
If you do not use ARScanManager, you will need to enable depth estimation in your app before starting a scan.
Scanning States
Here are the scanning states you will encounter using ARScanManager or IScanner.
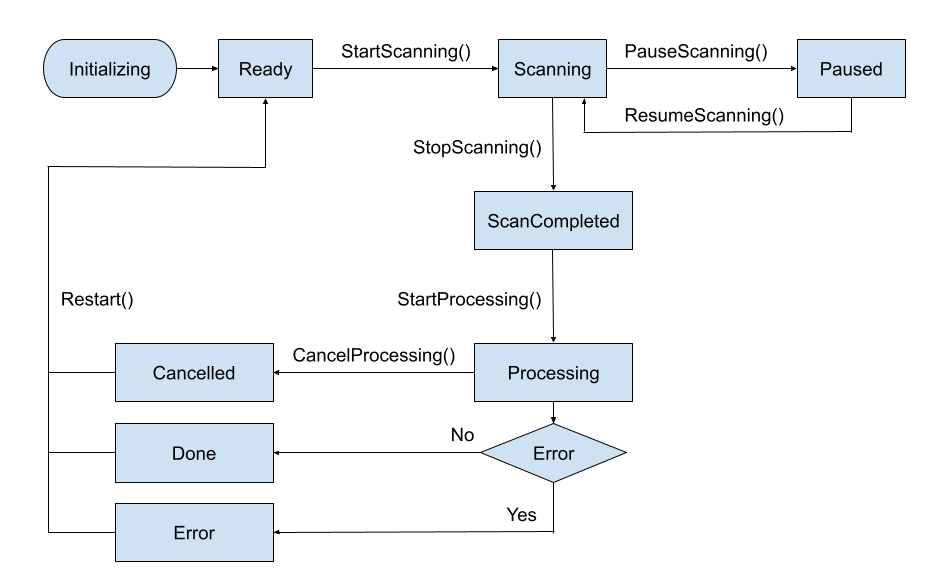
If you make rapid calls to the ARScanManager or IScanner methods listed in the diagram without checking the ScanState, you may experience unpredictable results.