Playing in Remote Mode
Using Remote mode to test on a device without redeploying to it.
Overview
In Remote mode, your code can run solely in Unity Editor’s Play Mode, allowing for code iteration to happen without re-deploying to a device. Under the hood, ARDK communicates with an instance of the Remote Feed application running on a mobile device to run ARDK code on the device and send relevant data back to Unity.
A connection between the Unity Editor and the Remote Feed app can be established through either a USB cable or the internet.
Note
Remote mode over the internet is being deprecated as of ARDK release 2.1.
Note
Running Remote with a Windows machine will result in degraded performance due to lack of frame compression.
Installing the Remote Feed Application
In order to use Remote mode, you need a AR-capable device with ARDK’s Remote Feed application installed on it.
To install:
Download the ARDK-Examples project from the Niantic developer portal ARDK Downloads page and import it into your Unity project.
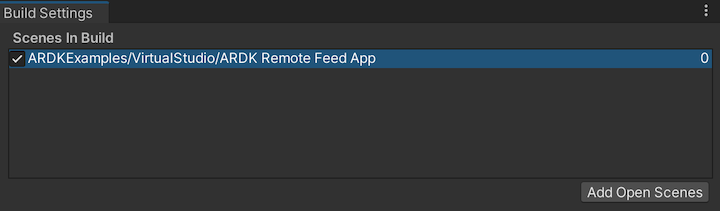
In your Project window, navigate to ARDK-Examples/VirtualStudio to find the ARDK Remote Feed App scene.
Go to Build Settings (menu: File > Build Settings) and drag the ARDK Remote Feed App scene asset into the Scenes In Build panel to include this scene in your build. Make sure it is either the only scene or the first scene in this panel, so that it is loaded upon opening the application on your mobile device.
Connecting the Remote Feed App
Open the Remote app on your mobile device, and select which connection mode you want to use. The screen should turn momentarily pink, then turn blue with the text “Waiting for connection…”
In the Unity Editor toolbar, open the Virtual Studio window (menu: Lightship > ARDK > Virtual Studio).
If you cannot see the Lightship window, try restarting the Unity Editor.
Open the Remote tab in the Virtual Studio window.
Select the same method of connection you selected in the Remote Feed app (Internet or USB).
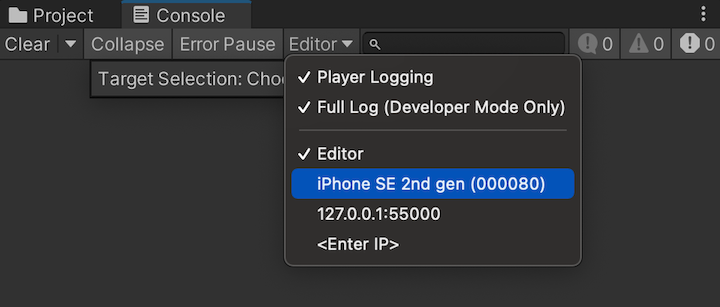
[For USB connection only] Select your device from the Editor drop-down of the Console window.
[For Internet connection only] Input the letters that the phone is displaying into the Virtual Studio window’s PIN field.
Enter Play Mode in the Unity Editor. The Remote Feed app’s screen should turn green, and the Virtual Studio window’s status should read “Connected.”
Once an ARSession is constructed and run, the Remote Feed app will start displaying the camera feed. The camera feed will be mirrored in the Game view tab of the Unity Editor if your scene is set up to render camera images from ARFrames (i.e. with the ARRenderingManager component).
Troubleshooting
The Virtual Studio window is stuck on pink text saying “Waiting for Remote Connection to be ready…”
(This means the Unity Editor cannot connect to the ARDK backend servers)
Check your computer is connected to the internet.
Check that authentication has been set up.
Check that you have the most up-to-date version of ARDK.
See the Networking section of the Troubleshooting page for more on how to diagnose server issues.
The ARDK Remote Feed App is stuck on the pink screen.
(This means the ARDK Remote Feed app cannot connect to the ARDK backend servers, and is only seen when using the Internet connection.)
Check your device is connected to the internet.
Check that authentication has been set up.
Check that you built the app with the most up-to-date version of ARDK.
See the Networking section of the Troubleshooting page for more on how to diagnose server issues.
The ARDK Remote Feed App is stuck on the blue screen, and the Virtual Studio window is stuck on the blue text saying “Waiting for a connection…”
(This means the Unity Editor cannot connect to the ARDK Remote Feed app)
If using the Internet connection:
Check that the input PIN is correct.
Check that the you selected the Internet option in the Remote Feed app, and the app is on the blue screen.
If using the USB connection:
Ensure you have selected Development Build when building the Remote Feed application.
Ensure your device is highlighted in Unity’s Console window’s Editor dropdown.
Try restarting both the Unity Editor and your Remote Feed application.
(Android only) If the above still fails, in order to connect your Android phone via USB you might need to set up a tunnel manually. To do this:
Open up the command prompt and type
adb forward tcp:34999 localabstract:Unity-{insert bundle identifier here}and replace{insert bundle identifier here}with the bundle identifier (Package Name) of the remote apk.Close and reopen Unity.
Check if you can now select the local player (
AndroidPlayer(ADB@127.0.0.1:34999))
Nothing happens when I press Play in the Unity Editor, even though both the app and the Virtual Studio window shows they are connected.
First, check that you are creating an ARSession with the correct
RuntimeEnvironment, and callingRunon the ARSession.Second, make sure you’ve subscribed to the appropriate callbacks for the data you want, and that you are rendering AR frames somehow.
The easiest way to receive and render AR frames is to add the
ARSceneCameraprefab to your scene, or add theARRenderingManagercomponent to a camera already in your scene. If you add anARRenderingManagerto your camera, you’ll also want to add anARCameraPositionHelperto ensure the camera moves with the device’s pose.
Lastly, when using a USB connection it can sometimes be the case that the Unity Editor will make a “false” connection and it is not actually connected to your device. Follow the troubleshooting checks above to ensure your device is connected to the Unity Editor properly.