Depth-based Occlusions
Place or move content behind real world objects without breaking immersion.
Overview
Without an understanding of depth, virtual objects will sometimes unrealistically be visible behind real world objects. For example, in the comparison below, the virtual Yeti without any occlusion is visible even as it moves behind the wall. With occlusion, the Yeti is properly hidden and appears much more believably part of the environment.
Occlusions are supported on any device that supports depth estimation.
General Occlusion Approaches
ARDK provides the following approaches to do occlusions.
Depth-based occlusions - good for dynamic objects (such as the user’s hands) but can be unstable and the occlusion results can flicker.
3D Mesh-based occlusions - good for static objects and stable but doesn’t work well for dynamic objects.
Currently you can’t use both depth-based occlusions and mesh-based occlusions at the same time. This page focuses on depth-based occlusions. For mesh-based occlusions, see Meshing.
Note
A third approach, depth blending, is currently available as an experimental feature. This approach uses both depth-based and mesh-based occlusions to get the best results. See Depth Blending for more details.
Occlusion Modes
ARDepthManager supports the following depth-based occlusion modes:
None: Occlusions are disabledDepth Buffer: The depth of an ARFrame is written to the target’s z-buffer.Screen Space Mesh: A screen space mesh based on depth estimations is used.Auto: Uses the depth buffer on capable hardware, falls back to using a screen space mesh otherwise.
We recommend using Depth Buffer to get the best results. If your app will be used on less capable devices, you can set the occlusion mode to Auto to have ARDK use depth buffer occlusions by default, but fall back to screen space mesh occlusions on older devices.
If you need a custom approach for doing depth-based occlusions, you can use the raw ARFrame.Depth buffer values for implementing your own occlusion system.
Enabling Occlusions
Use the following steps to set up depth-based occlusions.
Make sure you have an ARDepthManager and ARRenderingManager associated with a GameObject in your scene.
Set the
ARDepthManager’s OcclusionTechnique (Occlusion Mode in the Unity inspector) to the desired mode. We recommendDepth Buffer.(Optional) Add an ARDepthInterpolationAdapter to automate changing the
ARDepthManager’s InterpolationPreference value to that most suited for the current experience.
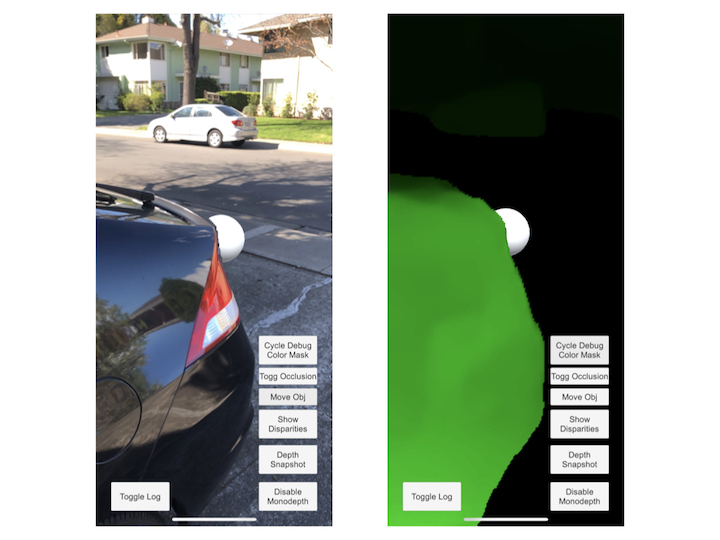
You can use ARDepthManager.ToggleDebugVisualization() to visualize the depth data or screen space mesh being used to occlude scene objects.
Suppressing Semantic Channels From Occlusions
You can suppress semantic channels when occluding objects. Suppressing a channel will push all pixels labeled with that channel to the max depth. If all of your virtual objects are placed above the ground, for example, suppressing the ground can be useful to reduce the chance of noisy/inaccurate depth outputs accidentally occluding your object.
To suppress a semantic channel:
Make sure you have an ARSemanticSegmentationManager associated with the same GameObject as your
ARDepthManager.Use ARSemanticSegmentationManager.SetDepthSuppressionChannels() (Depth Suppresion Channels in the Unity inspector) to set the channels you want to suppress.
For the up-to-date list of available channels, see Semantic Segmentation.
Additionally, you can use semantic data as a mask, effectively occluding virtual content from real-world content detected as belonging to a particular semantic channel. See Creating a Semantic Texture and Semantic Confidence <semantic_confidence> along with the SemanticSegmentation example scene in ARDK-examples for more details.
Understanding Screen Space Mesh Occlusions
If you’re unable to use depth buffer occlusions in your app and have to use screen space mesh occlusions, use the following details to understand how screen space occlusions works.
To achieve occlusions, the ScreenSpaceMesh occlusion mode is a ARDepthManager setting that creates a flat mesh that sits perpendicular to the camera view and then continually adjusts the mesh’s vertices to match depth estimation outputs. For optimal performance, depth is calculated exclusively in rendering shaders.
The aspect ratio and resolution of the occlusion mesh will not necessarily match that of the device camera or screen (those values are determined by the underlying deep-learning model). In particular, there will possibly be padding (empty space) between the left and right sides of the mesh and the screen edges, resulting in no occlusion happening in those regions.
The occlusion mesh has a number of vertices equal to the number of pixels on the depth texture plus whatever padding exists on the left and right sides.
ScreenSpaceMesh Occlusions and Meshing
If you’re using both ScreenSpaceMesh and Meshing in your scene, you may get undesired occlusion results. Meshing features of the ARDK by default enable Unity mesh occlusions, which can compete with occlusion calculations from ARDepthManager’s ScreenSpaceMesh technique.
You can disable Meshing occlusions by disabling Dynamic Occlusion in the Unity Mesh Renderer for the mesh prefab your ARMeshManager is using.