Advanced Tutorial: Gameboard Navigation
Build an advanced custom AR experience that allows procedural gameplay and lets characters appear and navigate the environment in a believable, immersive way.
This tutorial will show examples of how to configure the Gameboard and scan the physical environment to build its internal understanding of the user’s surroundings. It will also go into details on how to utilize the component’s smart placement and navigation features for AR applications.
Set up the Scene
Gameboard currently builds on top of meshing to understand the environment. Follow the steps of the Meshing Getting Started tutorial to get started.
We recommend you iterate in the Unity Editor, using Mock meshes. The easiest way to do this is by adding the MeshLoader prefab to the scene.
You can find the Gameboard scene and code described below in the ARDK-examples project, under the Assets/ARDKExamples/ContextAwareness/Gameboard directory.
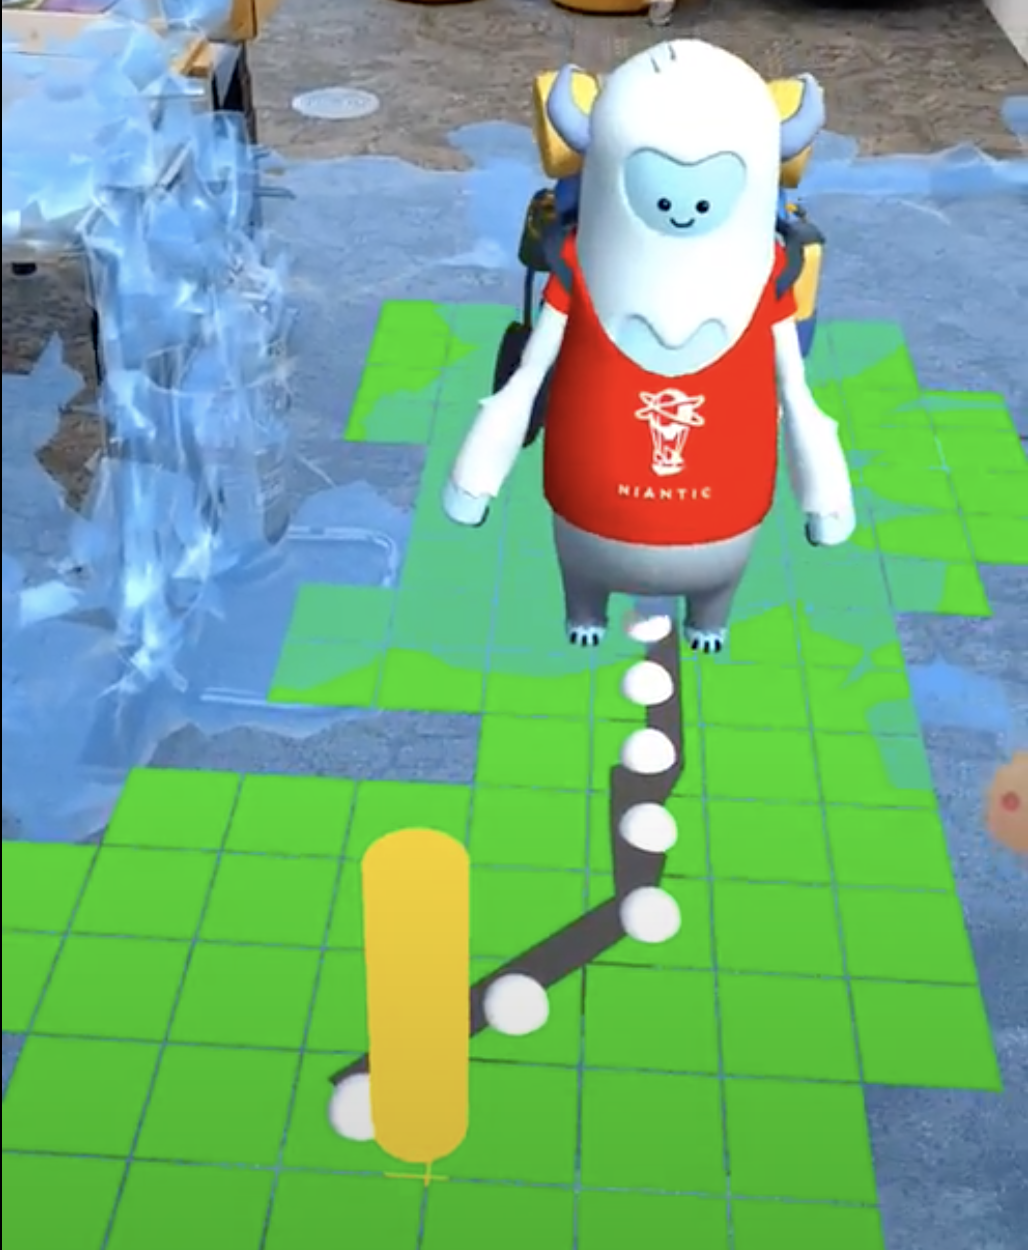
The example scene also provides an additional graphical user interface and touch input to place and move the agent through the GameboardExampleManager script.
Layers
Gameboard relies on raycasting against the Unity meshes generated by the ARMeshManager component in the scene. If you’ve imported the ARDK-Examples package into your own project, you must:
Add a new layer
ARDK_Gameboardto your project (Edit > Project Settings > Tags and Layers)Set the layer of
GameboardMeshChunk.prefabtoARDK_Gameboardand make sure that your ARMeshManager is set to use it as its Mesh Prefab.Find the
GameboardManagerscript and add it somewhere to the scene. Set its Scan Settings -> Layer Mask value toARDK_Gameboard.
Configuration
The GameboardManager class helps to take care of the Gameboard creation as well as regularily updating it in front of the camera by triggering scans. The Gameboard settings allows you to change how playable areas are defined and detected.
TileSize: The metric size of a node on the grid. The smaller this size, the higher the resolution of the grid will be. High resolution grids mean more raycasts on the same scan area, which may have a performance impact on the application.
FlatFloorTolerance: The standard deviation tolerance value to use when determining node noise within a cell, outside of which the cell is considered too noisy to be playable.
MaxSlope: Estimated surfaces are often times not perfectly flat. This value defines the maximum angle in degrees neighbouring nodes are allowed to deviate from each other to be considered flat.
StepHeight: The maximum amount two cells can differ in elevation to be considered on the same plane.
Scanning
One of the most important methods is Gameboard.Scan(origin, range).
Scanning updates the Gameboard’s internal understanding of the physical world. By providing an origin in world coordinates with a range, only the portion of the world that’s necessary for the application is updated. The GameboardManager script takes care of updating the Gameboard by triggering a new scan in front of the camera for every scan interval. The UpdateGameboard function in GameboardManager looks like this:
private Camera _camera;
float _scanRange;

private void UpdateGameboard()
{
    var cameraTransform = _camera.transform;
    var playerPosition = cameraTransform.position;
    var playerForward = cameraTransform.forward;

    // The origin of the scan should be in front of the player
    var origin = playerPosition + Vector3.ProjectOnPlane(playerForward, Vector3.up).normalized;

    // Scan the environment
    Gameboard.Scan(origin, range: _scanRange);
}
This method raycasts the fused mesh from the origin parallel to gravity. Depending on the resolution of the board, this method could have an impact on performance. The GameboardManager is set to scan 10 times per second by default.
Smart placement
Using the Gameboard.RayCast method, you can query the Gameboard whether a desired position is occupiable or not. This function is used to spawn objects and game characters clear from obstacles (e.g. furniture).
using Niantic.ARDK.Extensions.Gameboard;

Camera _camera;
IGameboard _gameboard;
GameObject _object;

void HandlePlacement()
{
    // Get a ray pointing in the user's look direction
    var cameraTransform = _camera.transform;
    var ray = new Ray(cameraTransform.position, cameraTransform.forward);

    // Intersect the Gameboard with the ray
    if (_gameboard.RayCast(ray, out Vector3 hitPoint))
    {
        // Check whether the object can be fit in the resulting position
        if (_gameboard.CheckFit(center: hitPoint, 0.4f))
        {
            _object.transform.position = hitPoint;
        }
    }
}