VPS Remote Authoring
Ahoy Lightshippers and welcome! Thank you for trying our new VPS Remote Authoring experience in Unity! We’re excited to provide you with an in-editor experience for creating Wayspot Anchors, saving them to file or project, so that you can easily create experiences for VPS end to end, all from the comfort of your own home or office! Without further ado, let’s get started!
Note
This feature is in public beta and is subject to change. For more information on the different launch types see Lightship Launch Types
Using the Geospatial Browser
Step One: Find a location to author against
Lightship.dev has a new tool baked into the website called the Geospatial Browser. This tool was designed to help you discover all manner of VPS data that has been captured by our team and by other developers (like yourself) that was shared publicly with the rest of the Lightship community! There’s a lot of it, so you’ll want to use filters to try and limit your search for what you need. Please see “Geospatial Browser Best Practices” below to learn more about different types of Wayspots. You may also need to toggle through several meshes before finding a suitable one for in-editor usage – we are working on improving mesh quality for the future. See “Geospatial Browser Best Practices” below for recommended filters.
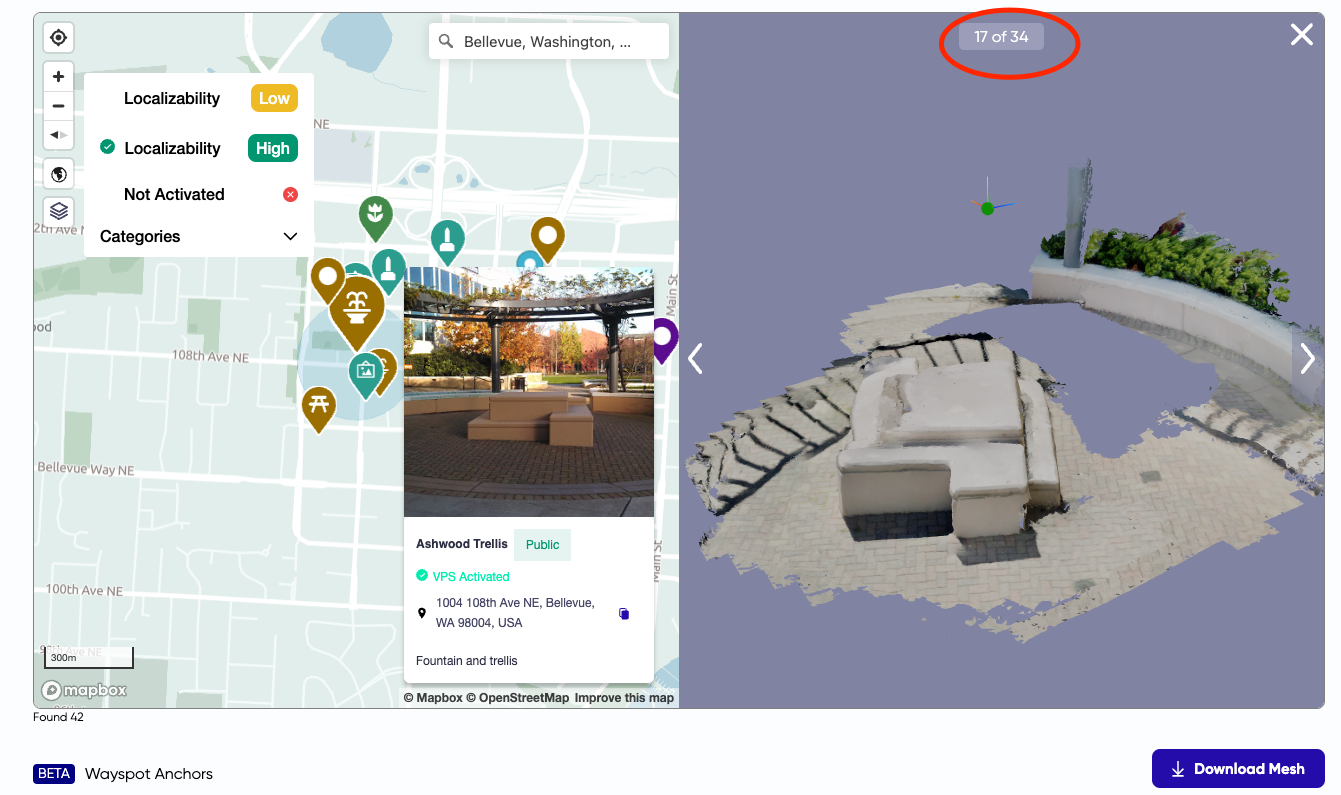 The new Geospatial browser available on Lightship.dev. There is an option for the geospatial browser in the left side main menu on the lightship website. Note the filters button and list where you can adjust your content search.
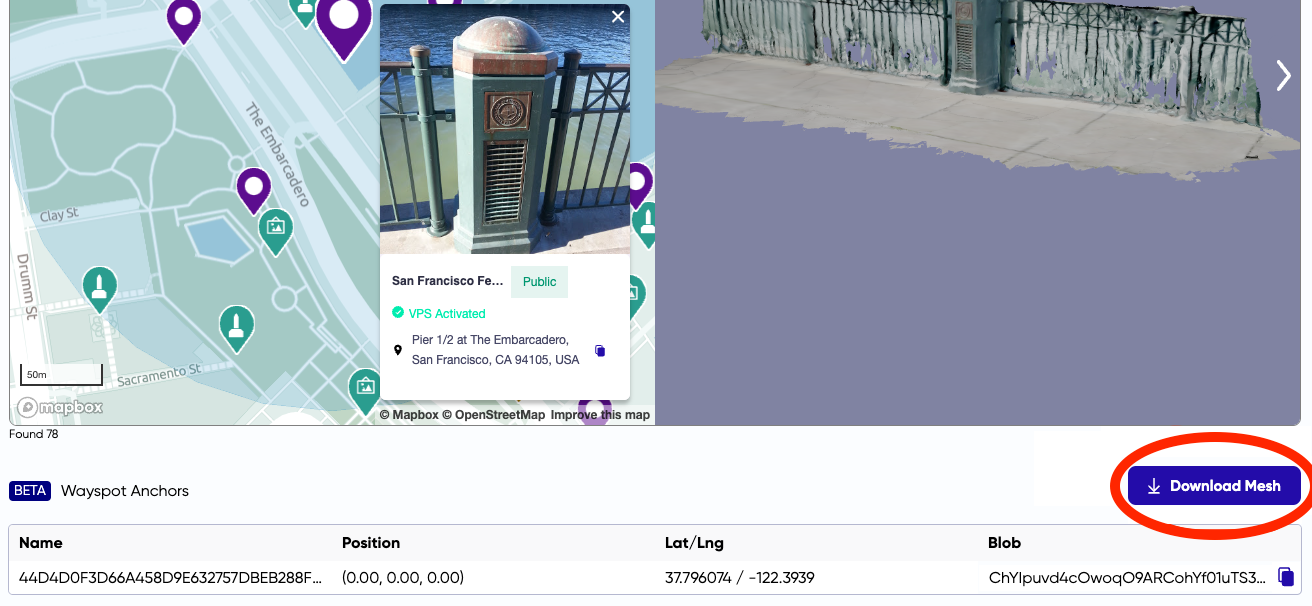
Step Two: Download the Location Zip File
By clicking on the blue button for a mesh in the bottom right corner of the viewport, you can download location information in the form of a location zip file to your local development machine. There is no need to unzip the Location zip file. Leave the package zipped and move on to the next step.
Using the Remote Authoring Assistant
Step Three: Drag the zip file into your Unity project
Provided that you installed the Remote Authoring package in your project, your Unity project should now know how to handle a location zip file that you downloaded from the Geospatial Browser.
You can drag the zip file into your project folder in Unity OR you can use the Lightship Remote Authoring Assistant to import your zip file. If you use the drag and drop method, the Remote Authoring Assistant will attempt to import your location package and prompt you to launch the Remote Authoring Assistant scene.
Step Three (Alt): Launch the Remote Authoring Assistant and Import Location Package
Alternatively, you can launch the scene first (ARDK > Lightship > Remote Authoring Assistant > Open), select the RemoteAuthoringAssistant Game Object and follow the prompt to Import New Location in the Inspector window.
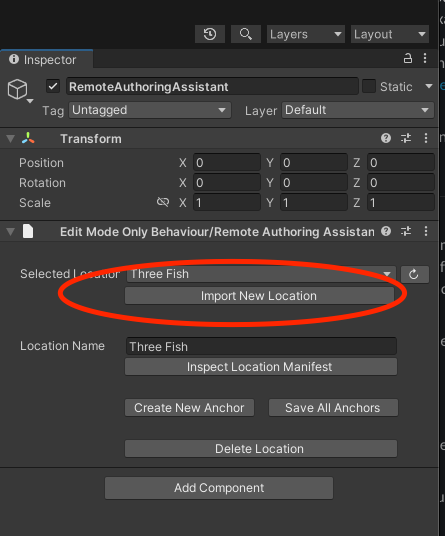
Once the location is imported, you can now explore the remote authoring scene in the editor by choosing that location in the Selected Location dropdown menu on your RemoteAuthoringAssistant.
Note
Important: Your location is imported into an editor only scene used by the Remote Authoring Assistant. Use the RemoteAuthoringAssistant UI to work with this scene as described in the next steps, and don’t edit the editor scene content directly. The “Making a Build” section explains how to export your anchor content into a playable scene.
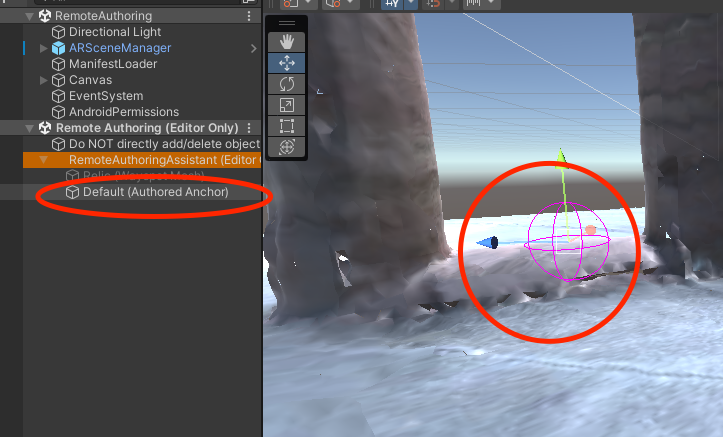
Step Four: Move Your Default Anchor
You will find child objects within your RemoteAuthoringAssistant Game Object. By default there is one moveable child object named “Default”. This is your initial origin anchor. You are free to rename this anchor and move it around. In the scene view you can see that a red placeholder gizmo identifies this Anchor and its position in relation to your location.
Because of the way meshes are generated, some default anchors may appear farther from the mesh than expected and you may need to move the GameObject to into scene view.
It may be convenient to see how your content would look placed at one of these anchored points. We anticipated that! To associate a GameObject prefab to an anchor, simply add a GameObject to the AssociatedPrefab list on your Anchor object. The authoring assistant will now visualize your game content in relation to your anchor as you move your anchor around.
Don’t forget to save your anchors as you move them around!
Note
Advanced user tip: Saving an anchor is how your wayspot anchor payload gets generated (which would be visible in the Payload section of your anchor component. If the payload section is Invalid you must Save your payload to see your serialized payload string.
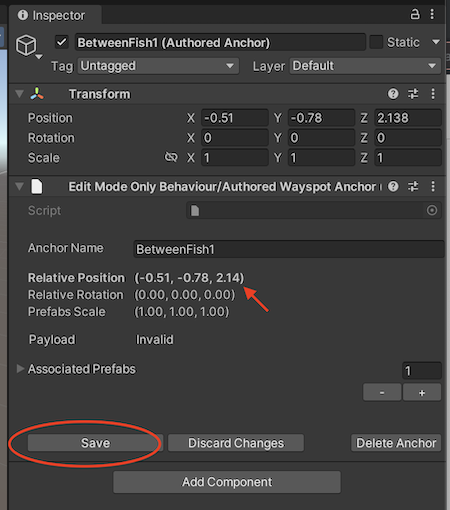 Note how you can see if a property on your anchor is not yet saved. Such properties remain bolded until a Save occurs.
Step Five: Create New anchors
You may want more than one anchor to be defined in your location. You can use the RemoteAuthoringAssistant component and click on Create New Anchor. You can have any number of anchors in your location.
Just remember that you should not try to create these game objects manually. DO NOT USE Unity’s built-in “Duplicate” function on anchor game objects. You must use the RemoteAuthoringAssistant UI to Create, Delete, and Save anchor content. Using the RemoteAuthoringAssistant UI to Create, Delete, and Save content ensures that changes are saved in the LocationManifest…
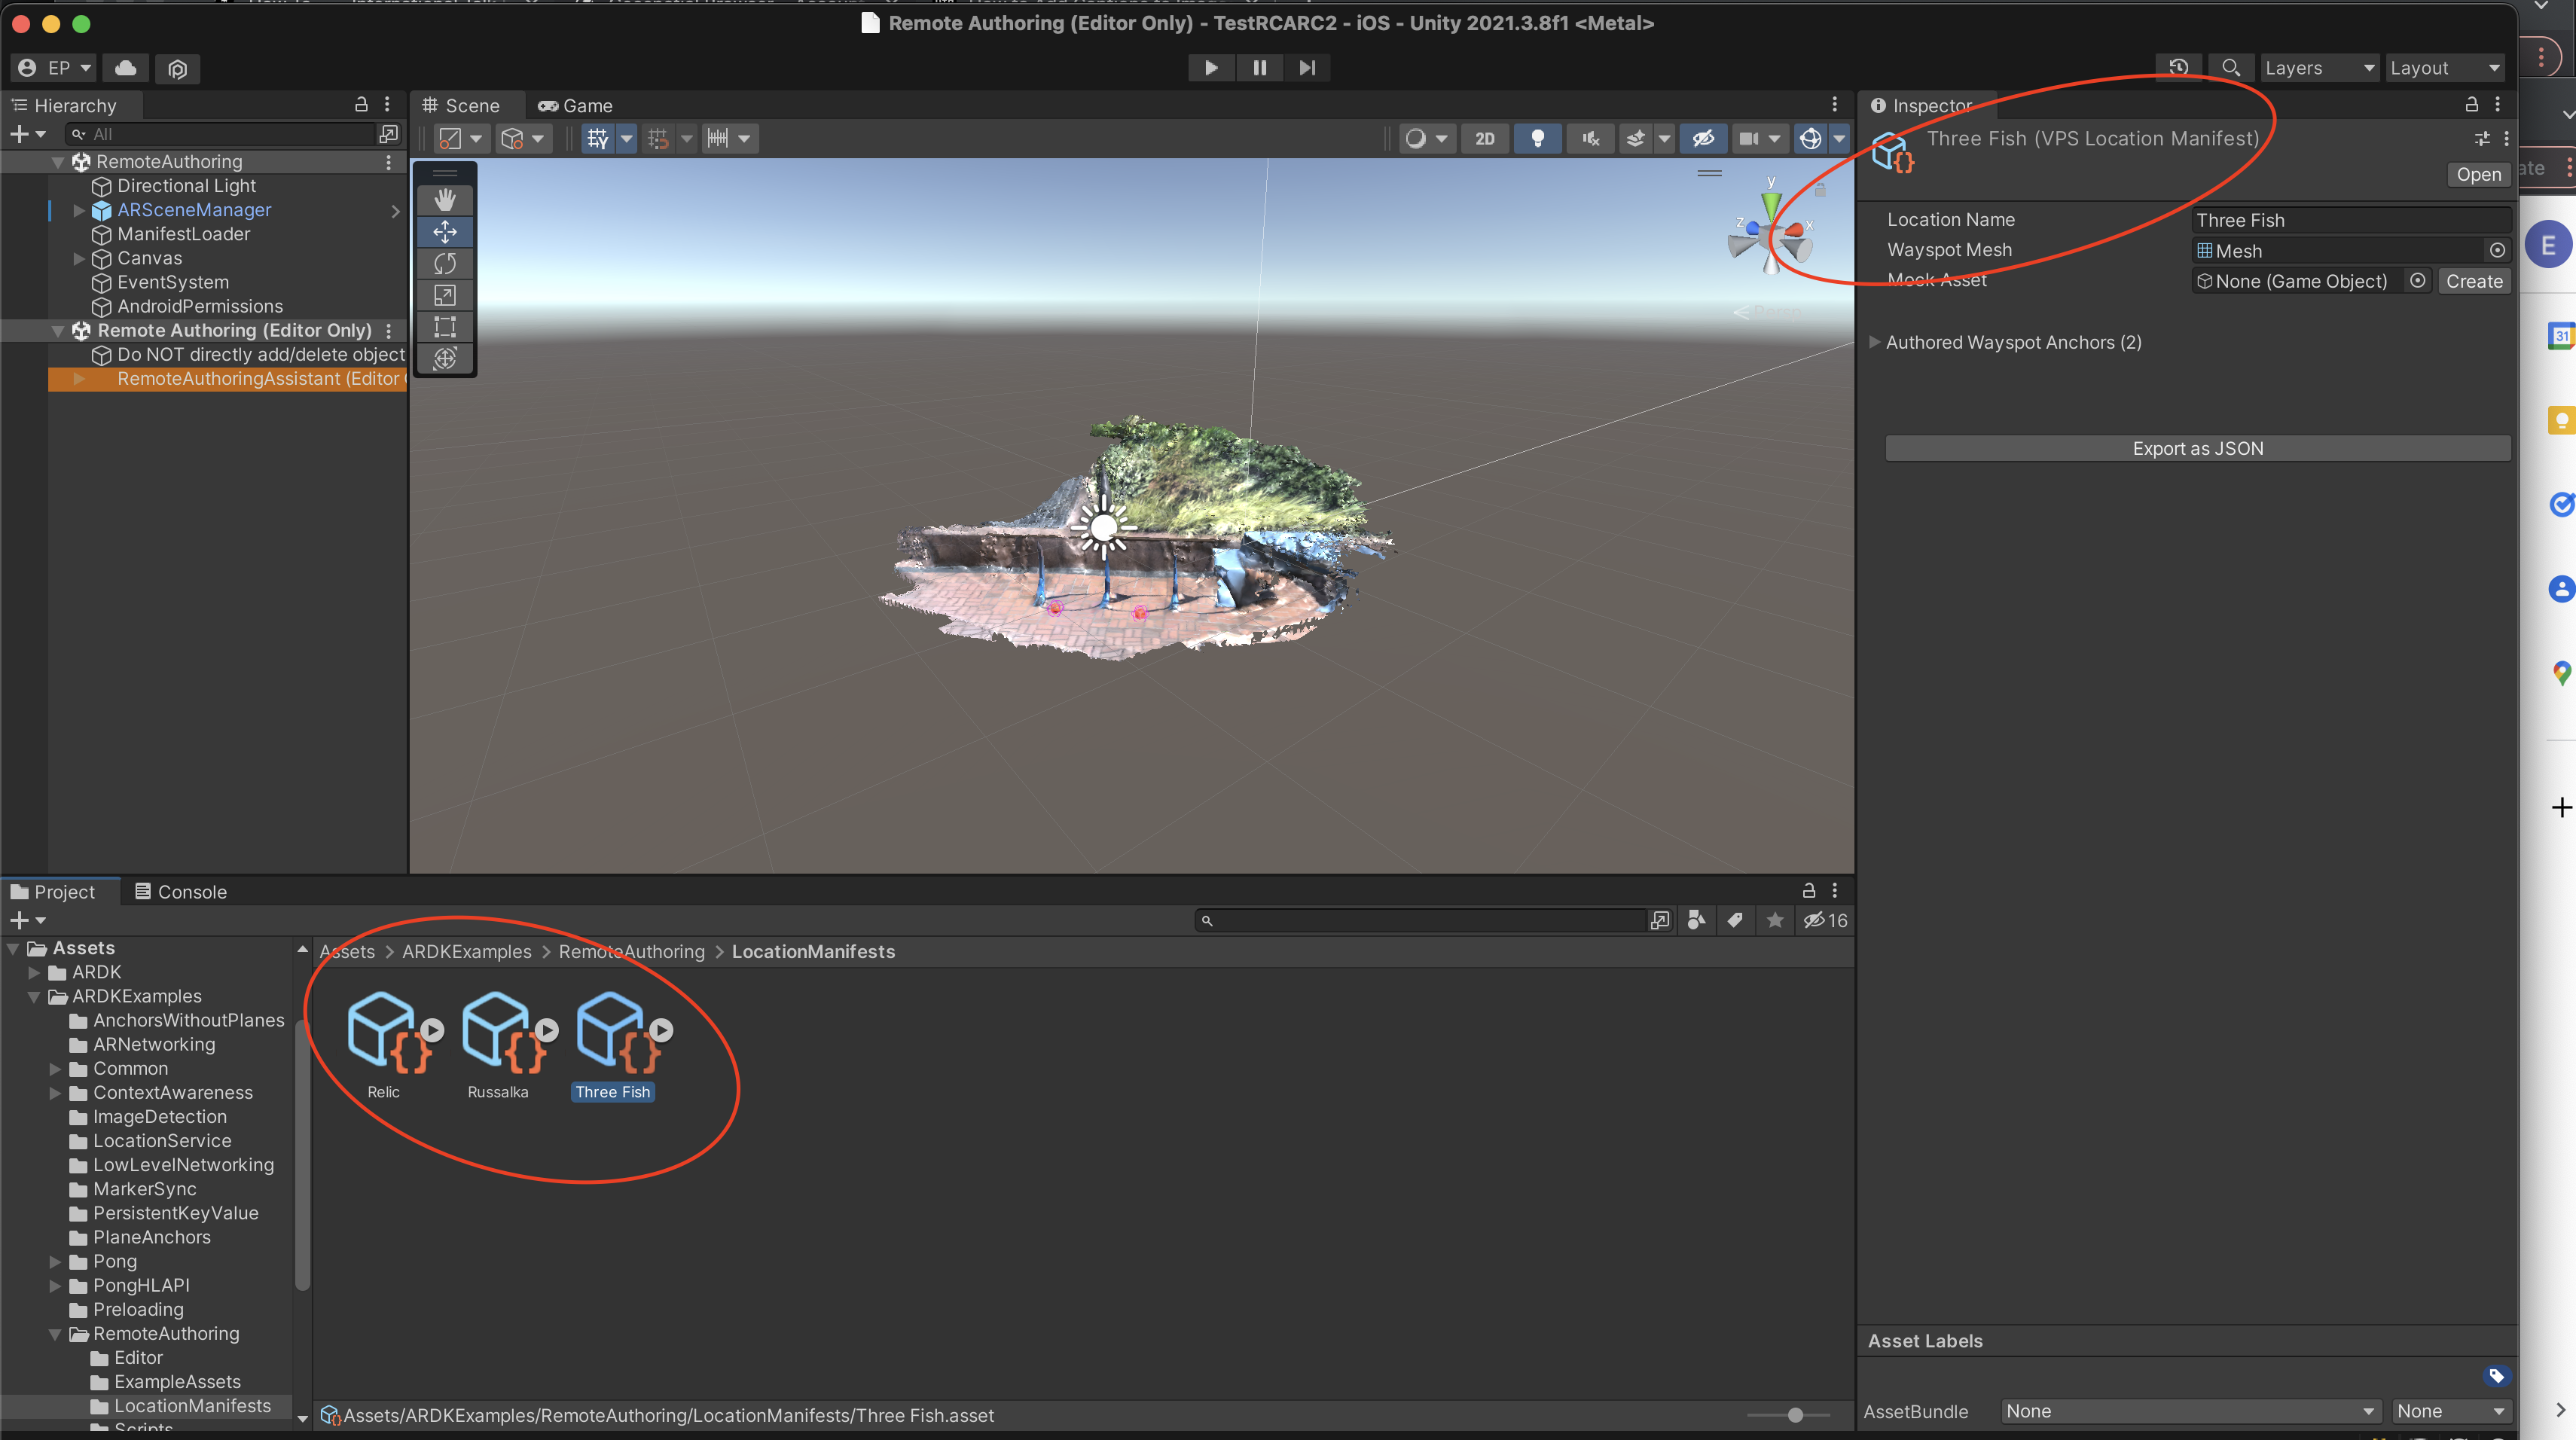
Congratulations! You now have authored anchors at your first location. You have anchor content stored in a Location Manifest, which is a scriptable object that was generated when you first imported your zip file! You can use that manifest to generate a JSON manifest if you choose, that you can bring into your AR build.
Note
Advanced Concept Note: The VPSLocationManifest is an Editor ONLY scriptable object. This makes the file impossible to use outside of the context of the Editor. Storing this manifest in your build or in an asset bundle is not possible so we’ve provided a means of exporting to JSON TinyVPSLocationManifest (discussed in “Best Practices” below) for storing anchors in a lightweight data structure. Runtime applications require generating a TinyVPSLocationManifest which is seen in the LocationManifestManager script in the RemoteAuthoring example scene described in “Making a Build” below.
Making a Build
If you want to show your content in a build then we’ve made it easy for you! If you want to build something that’s part of a larger infrastructure, we have some tips and tricks for you to do that as well. Read on for hints on how to use the RemoteAuthoring example scene!
You can find the example scene in the ARDKExamples folder under RemoteAuthoring. This scene makes it easy to use the Location Manifests you’ve generated and consume them at runtime.
Step One: Open the RemoteAuthoring Example scene and find the “ManifestLoader” game object
The LocationManifestManager component found here was designed to be extremely easy to use and fast to get up and running! To add your own content, drag your manifests into the drag and drop box at the top of the component.
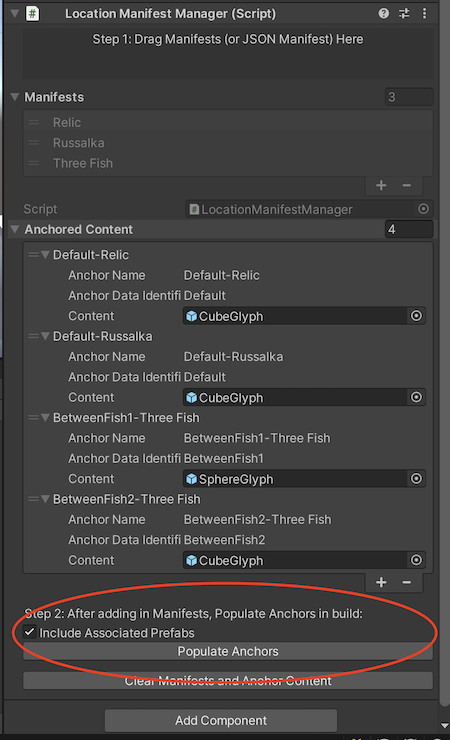
This location accepts both LocationManifest scriptable objects as well as Location Manifests JSON exports. Click the Populate Anchors button at the bottom of the component. From here you can attach content to your anchors if you have not done so already.
Step Two: Choose your manifests and populate anchors
To bring in anchors from your location manifest press the Populate Anchors button towards the bottom of the component. The Anchored Content list will be populated with any Unity GameObject based content associated with your anchors. If you’ve used the Associate Prefab option while making your anchors then you should see your game objects in the list that is populated when you click the Populate Content toggle. When running the RemoteAuthoring example, the content will be loaded when the user presses the Load button and will become visible after the user has localized to the corresponding location.
Step Three: Run in Play Mode (Use a Mock)
While developing an application you may want to see your code run in your application without having to build it to your phone first. You can make this easy by using the location manifest to create a mock asset for testing in the editor! Find a location manifest and click the Create button. You now have a mock asset you can use for testing in Editor.
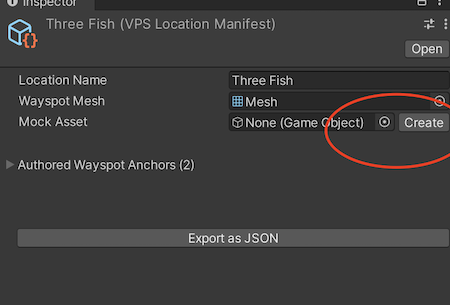 Use the Create button to create a mock to test with in Editor
To use it, simply navigate to ARDK’s Virtual Studio (ARDK > Lightship > Virtual Studio), select your newly created Mock scene in the drop down, and click the Play button in the Unity editor.
Step Four: Make a build
At this point you should have all you need to make a build of your AR experience on an Android or iOS device. Please note: for ARDKv2.3, apps must target Android 12 (API level 31) or higher. Follow the steps to make a build on your device of choice!
Thank you for using our system! As always, your feedback is greatly appreciated. We look forward to hearing from you about the utility of this system. Please do not hesitate to let us know if there is anything you’d like to see in this feature or ways you think we could improve this experience!
Geospatial Browser Best Practices
Here are some tips for navigating through our large collection of Wayspot meshes!
Ranked VPS Activated Wayspots - Fair and Good Quality
We have ranked Wayspots we think will give you the most reliable outcomes. Some Wayspots are not as great at being localized against as others. Use the Good Quality filter to ensure the best performance for VPS and location detection when you go test your app out in the wild! The Geospatial Browser defaults to show only Good Quality Wayspots.
Not Activated Wayspots
Our Geospatial Browser shows all Wayspots in our system, many of which are not yet activated for VPS. We show Not Activated Wayspots so that you can see future locations where VPS will be available, but unfortunately we will not have meshes for you to use at these locations. If there is a Not Activated Wayspot you would like activated please let us know in the forum. VPS activated locations also have the advantage of being picked up by our VPS Coverage API, meaning that you should have a much easier time leading a player to your location by providing thumbnails, GPS coordinates, and tracking players’ distance to the target. To use VPS and Remote Authoring, you will need to use VPS Activated Wayspots.
If you can understand what you’re looking at, you’ll make better experiences
Unfortunately, not all of the meshes in our system are easy to discern when looked at. Some of them are strips of road, some are a random bush without any surrounding building or placement context. Rather than trying to author against content that does not meet your needs, it’s best to provide us with feedback about why this location was of interest to you, so we can provide you with better data in the future! Let us know when data looks interesting to you and when we missed the mark. We are looking forward to improving your content discovery experience and authoring opportunities as soon as possible.
Unity Editor Best Practices
Using JSON to store your manifest data somewhere else
You may not want to bundle a manifest in your project. While we don’t want to prescribe the best way to do that (create a JSON, use a database, etc), we’ve attempted to make it easy for you to save living data like anchors outside of the build so that you can update said content without having to always make a new build.
Manifest scriptable objects have an Export to JSON option that allows you to save a lightweight version of your remote content anchors. With the following two lines of code, you can transform that JSON content back into the TinyManifests data structure that is used in the example code.
var jsonString = (obj as TextAsset).text;
var manifest = JsonUtility.FromJson<TinyVPSLocationManifest>(jsonString);
When paired with Unity examples about how to read a file from the web, creating a remote manifest for your project is fairly straightforward.
Known Issues & Workarounds
The Default anchor cannot be used in Mock mode with Virtual Studio.
Every location that is imported will contain an anchor named “Default (Authored Anchor)”.
Attempting to load this anchor in virtual studio mock mode will result in the following exception “FormatException: Unrecognized Guid format.”
The work around is to either:
Delete the anchor named “Default” and create a new anchor.
Change the position or rotation of the Default anchor.
This is only a problem when running in mock mode in the Unity editor. When running on device, the default anchor does not show this behavior.
When using a mock location in the Unity editor (with Virtual Studio), loading content for a different location will cause an error.
The error will show up as an exception “ArgumentException: An item with the same key has already been added. Key: 00000000-0000-0000-0000-000000000000”.
The work around is to only load content for the currently selected mock location.
It is not currently possible to switch mock locations while running with Virtual Studio without restarting the editor play session. Therefore, only one location can be tested in each play session when using mock locations.
Anchors for each location must have unique names.
If a single location manifest contains anchors with the same name, you will encounter errors when loading the content for that location.
In Mock mode in the Unity editor, an exception similar to the following will be generated: “ArgumentException: An item with the same key has already been added. Key: eeaa8ed7-15bf-49bc-9b9a-7c5466b4ae5f”.
On device, some of the content for the selected location will be missing.
The work around is to ensure that all anchors within a single location manifest have unique names.
Not clicking the “Populate Content” button on the ManifestManager after making changes with the RemoteAuthoringAssistant can result in stale content and/or errors.
The ManifestManager is not updated until “Populate Content” is pressed.
If changes or fixes are made to the locations in the RemoteAuthoringAssistant, those will not show up at runtime unless “Populate Content” is pressed.
The work around is to always press “Populate Content” before running in editor or building to device.
With AR depth enabled, assets that are located more than ~20 meters from the user may not show up in the app experience – keep anchors within or a short distance from the mesh surface area.
If you use the Remote Authoring Assistant to associate multiple prefabs with a single anchor, only the first prefab will be picked up by the ManifestLoader – you will receive a Unity warning in the console when trying to associate more than one prefab.